Capture 15–20s Verified Video Reviews on Shopify with QR Codes

Yes, QR codes work for collecting reviews, specifically the verified, post-purchase video kind that Shopify product pages need most. Place the code where the customer is already holding your product (the packaging insert), point it to a mobile-optimized recording page, and skip everything else until that flow is solid. Baymard’s research on reviewer-submitted media and Shopify’s own guidance on post-purchase capture both back this up, and Peers builds the whole loop natively for Shopify stores.
TL;DR:
- Placing QR codes on packaging inserts significantly boosts review submissions by capturing customers during their peak unboxing engagement.
- A simple, mobile-optimized recording flow with minimal fields and native browser recording prevents drop-off during video capture.
- Displaying reviews in a single, easy-to-navigate gallery with additional filters greatly enhances usability and reduces bounce rates.
- Tying submissions to order verification and implementing automated moderation with clear consent protects legal compliance and content quality.
- Using dedicated tools like Peers simplifies implementation by integrating capture, moderation, and review display directly within Shopify at minimal setup effort.
Table of Contents
- How QR-Code-Led Video Review Collection Actually Works
- Where to Place QR Codes for the Highest Response
- What to Say When Asking for a Video Review
- How to Display Video Reviews and Q&A on the Product Page
- Moderation, Consent, and Basic Legal Guardrails
- Measuring Whether Your QR Review Program Is Working
- What Actually Separates a Working Program From a Stalled One
- Getting This Running on Shopify Without Building It Yourself
- Sources
- FAQ
How QR-Code-Led Video Review Collection Actually Works
A QR code is just the entry point. What happens after the scan determines whether you get a usable video or an abandoned tab.
Here’s the flow that works:
- Customer scans the QR code on the packaging insert, receipt, or email.
- They land on a mobile-optimized page, no app download, no desktop redirect.
- The page verifies the order with a simple token or email match, not a full login.
- Customer records or uploads a short video directly in the browser.
- They check a consent box and optionally add a caption.
- The submission enters a moderation queue.
- Once approved, it publishes to the relevant product page.
Mobile optimization isn’t optional here. Most QR scans happen on a phone camera, and if the landing page asks someone to pinch, zoom, or wait through a slow load, you lose them before they hit record. Baymard’s research on reviewer-submitted images confirms that friction at upload is one of the biggest reasons visual reviews get abandoned mid-submission. Keep the form to two or three fields, maximum, and let the browser handle recording natively instead of forcing an app install.
Where to Place QR Codes for the Highest Response
Not all placements perform equally, and the difference isn’t small. The packaging insert or unboxing card wins by a wide margin because it catches customers at their peak emotional engagement with the product, right when they’re excited enough to talk about it on camera.
After that, a few digital touchpoints carry real weight:
- Thank-you page after checkout, while purchase intent is still fresh.
- Post-purchase email or SMS, sent once the order has actually arrived, with a QR code plus a typed fallback link for anyone reading on desktop.
- Delivery confirmation pages, especially for carriers that let you customize the tracking experience.
- Receipts or POS screens for stores with a physical retail presence.
Every code needs a scannability check before it ships: test it from arm’s length under normal indoor lighting, keep contrast high, and if you overlay a logo, keep it small and centered so it doesn’t block the corner markers. Shopify’s own QRCode component documentation specifically recommends testing scannability and always including a fallback URL near the code, since a percentage of scans will fail on older phone cameras.
Pro Tip: Print the fallback URL in a font size someone could actually type from memory, not a six-point disclaimer. If the code fails, that line is your backup conversion path.
What to Say When Asking for a Video Review
The ask matters as much as the placement. Vague requests like “Tell us what you think!” produce vague, low-effort videos. Specific requests produce usable footage.
Try microcopy like this:
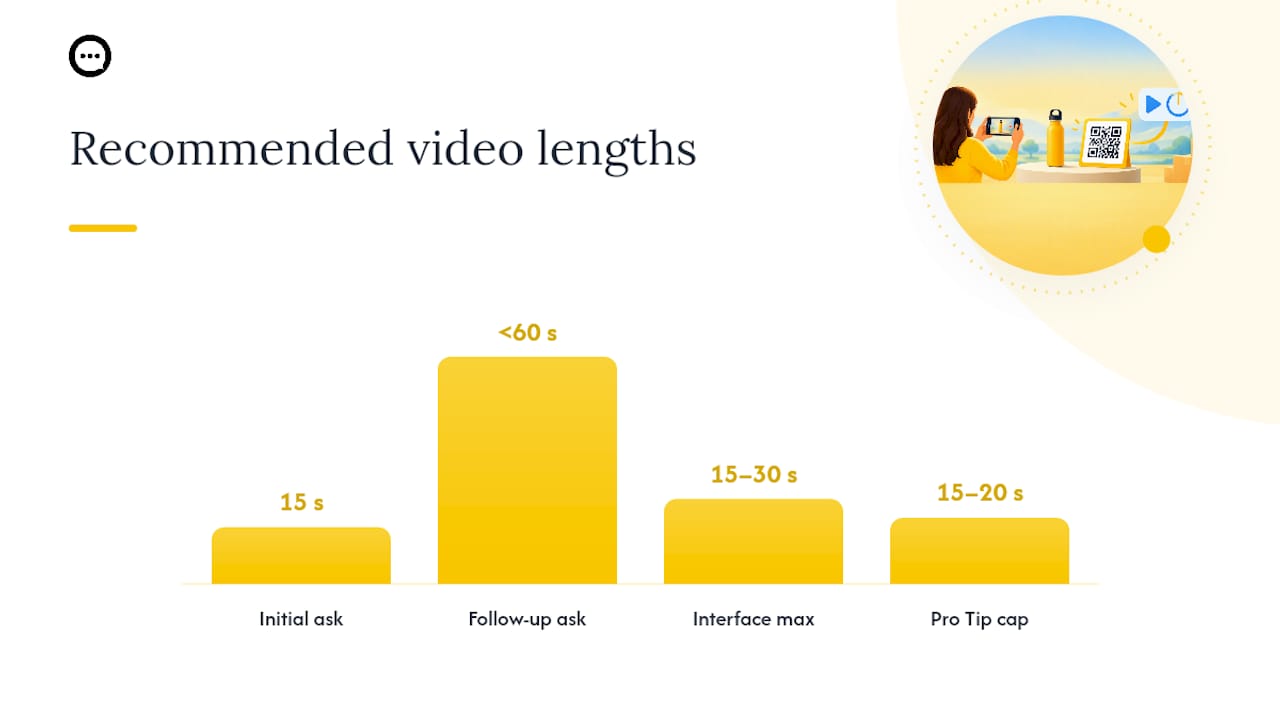
- Initial request (day 7 to 14 after delivery): “Record a 15-second video showing how you use [product name]. Real reactions only, no script needed.”
- Follow-up (day 14 to 21): “Still loving [product name]? A quick video from you helps other shoppers decide. Takes under a minute.”
- Final reminder (around day 30): “Last call: show us how [product name] fits into your day. Get [discount amount] off your next order for a video review.”
Staggering the ask this way, written reminder first, video follow-up second, tends to lift response rates compared to a single blast, according to guidance on Shopify UGC video strategy. The exact wording matters less than the specificity: tell people how long the video should be and what to show.
On incentives, keep it simple. A flat discount code for the next purchase outperforms complicated point systems or tiered rewards, mostly because customers understand it instantly and don’t have to calculate whether it’s worth their time. If you run a loyalty program, featured placement or a small gift can work as an alternative, but don’t stack three incentive types into one ask.
The recording interface itself should have one visible record button, a short max length (15 to 30 seconds is plenty), an easy retake option, and a required consent checkbox before submission. Anything more complex than that and you’ll lose people at the interface, not the intent.
Pro Tip: Cap the recommended length at 15 to 20 seconds. Longer videos sound better in theory but almost always mean fewer people finish recording.
How to Display Video Reviews and Q&A on the Product Page
Collecting the videos is half the job. Displaying them badly wastes the effort.
The single biggest mistake is trapping each video inside its own isolated review card, forcing shoppers to close one and reopen another to see more. Baymard’s research on cross-review navigation found that shoppers expect to browse across reviewer-submitted media in one continuous gallery or overlay, and fragmented navigation makes visual reviews far less useful than they should be. Build a single carousel or gallery instead.
A few other display rules that consistently help:
- Show the total review count and a ratings distribution near the video gallery. Baymard’s research on ratings distribution found shoppers actually trust a product with many reviews and a slightly lower average more than one with a perfect score from just a handful of buyers.
- For high-AOV products, consider a sticky or above-the-fold video module on mobile, where scroll depth to reviews is often worse than on desktop.
- Add simple filters like “videos only” or variant-specific tags, so a shopper looking at the blue version isn’t scrolling past ten videos of the red one.
- Surface shopper Q&A right next to the relevant videos instead of in a separate tab. Someone watching a video about fit is exactly the person who wants to ask a sizing question.
Keep the videos themselves lightweight. Render thumbnails that open into an overlay rather than auto-loading every clip on page load, and lean on lazy loading or a CDN, otherwise you’ll trade review-driven conversion gains for a slower page that hurts conversion anyway.
Moderation, Consent, and Basic Legal Guardrails
Every submission needs explicit consent at the point of upload, a checkbox tied to a short, plain-language statement about where the video may appear (product page, ads, email). Skipping this step creates real legal exposure the moment you republish someone’s face and voice without a clear record of permission.
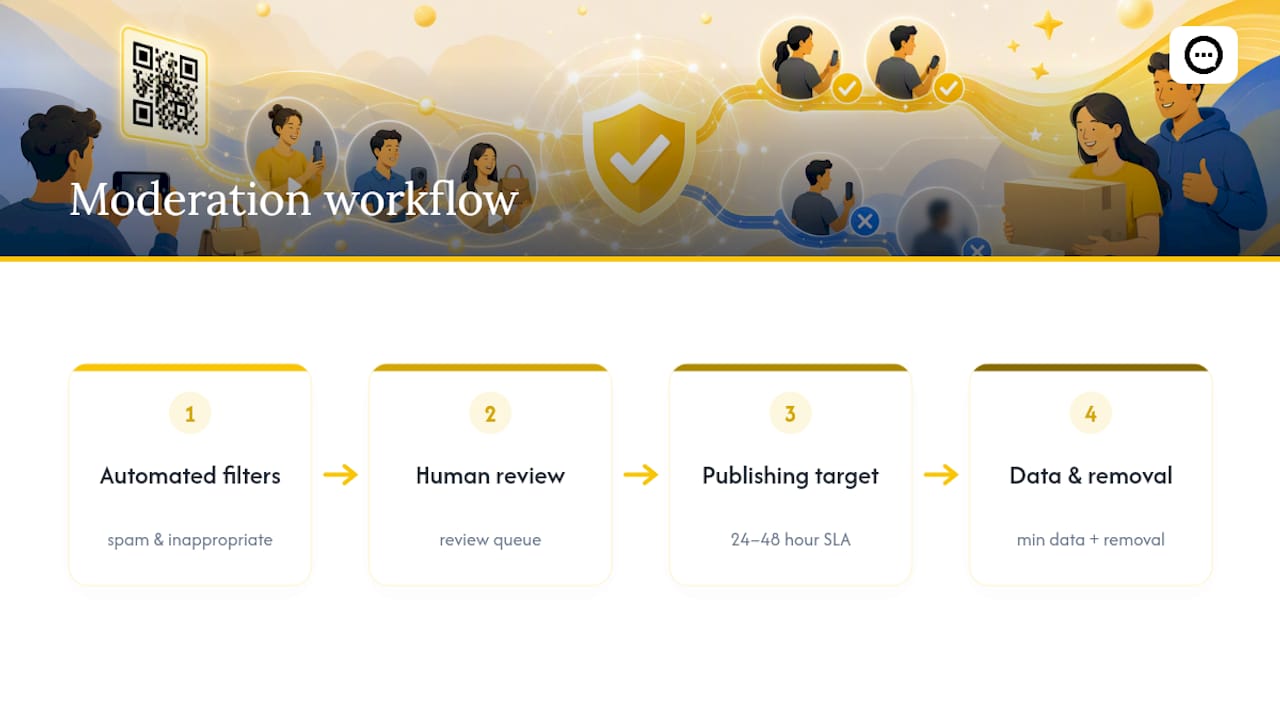
Run automated filters first to catch obvious spam or inappropriate content, then route everything through a human review queue with a short service-level target, 24 to 48 hours is reasonable, so approved videos don’t sit unpublished while enthusiasm fades. Store only the minimum data needed to tie a video to a verified order, and give contributors an easy way to request removal later. Simple, documented processes here matter more than legal complexity.
Measuring Whether Your QR Review Program Is Working
Track a small set of numbers, not a dashboard full of vanity metrics. The ones that actually tell you whether the program is paying off:
- Video submission rate per QR impression or scan.
- PDP video view rate, how many product-page visitors actually open a video.
- Add-to-cart rate and conversion rate on pages with videos versus without.
- Change in average order value on video-enabled product pages.
Worth testing early: CTA copy on the QR insert, incentive versus no incentive, and gallery placement above versus below the fold. Run these as sequential experiments rather than all at once, or you won’t know which change moved the number.
Report submission volume weekly while you’re still building a sample size, then shift to monthly reviews once you’re measuring conversion impact. Early response rates on any single QR touchpoint will look small, often in the low single digits, but a large share of shoppers rely on customer photos and videos before buying, so even a modest, steadily growing video library compounds into a real trust signal. For structured A/B testing frameworks on the CTA and placement experiments above, conversion rate optimization guides offer a useful starting framework.
What Actually Separates a Working Program From a Stalled One
Most merchants get the QR code right and the follow-through wrong. They print a nice code, get a handful of submissions in week one, and then let the moderation queue and display gallery rot while they move on to the next project. The QR code is the cheapest part of this entire system. The workflow behind it, verification, a frictionless recording page, a real gallery, is where programs actually live or die.
The mapping matters too: a packaging-insert QR feeding a rushed, unverified upload form will always underperform, no matter how good the placement is. Peers was built around that exact workflow, capture, verification, moderation, and PDP embedding, as one connected system rather than five disconnected tools duct-taped together.
— Leo
Getting This Running on Shopify Without Building It Yourself
Everything described above, order-verified capture, a mobile recording flow, a moderation queue, and a gallery with counts and Q&A, is exactly what Peers was built to run natively inside Shopify. You’re not stitching together a form builder, a video host, and a separate reviews app; it’s one workflow built specifically for the Shopify product page.
Setup takes a few minutes: install Peers from the Shopify App Store, turn on post-purchase capture, and connect it to your packaging insert or thank-you page workflow. Moderation and consent capture are built in, so you’re not assembling that piece separately. The plans let you start collecting and embedding video reviews with options for different usage volumes; current pricing details are on the pricing page. Head to the Shopify App Store listing and turn on your first capture point today.
Sources
- 8 UGC Examples for Ecommerce Brands (2026) - Shopify
- Allow users to upload images with their review – Baymard
- QRCode component — Shopify dev docs
FAQ
Do QR Codes Actually Increase Review Submissions?
Yes, especially when placed at high-engagement moments like unboxing rather than passive spots like a footer link. A QR code on a packaging insert captures customers while they’re still excited about the product, which tends to produce more submissions than the same request buried in a generic follow-up email.
Where Should I Put My QR Code First If I’m Starting From Scratch?
Start with the packaging insert or shipping box, since that catches the unboxing moment when engagement peaks. Add a thank-you page and post-purchase email as your second and third placements once the core recording flow is tested and working.
What’s the Ideal Length for a Customer Video Review?
Fifteen to 20 seconds is the sweet spot. Longer asks sound reasonable on paper but consistently produce fewer finished submissions, since most customers won’t script or edit a longer clip.
How Do I Stop Fake or Low-Quality Video Submissions?
Tie every submission to order verification through a token or matched email, then run it through automated filters before a human moderation queue. This keeps unverified strangers out of the pipeline while catching anything inappropriate before it reaches the product page.
Does Peers Handle the Whole QR-to-Product-Page Workflow?
Yes. Peers manages capture, order verification, moderation, and embedding video reviews and shopper Q&A directly on Shopify product pages. It offers a Free plan to start and a Peers Growth plan at $15 per month for higher-volume stores, both available through the Shopify App Store.